cflag - 包装和扩展 Go flag.FlagSet 以构建简单且漂亮的命令行应用程序。
使用 flag 包
Go flag 是Go内置的包,使用 flag 包构建一个命令应用非常简单。
cflag/_example/rawflag.go
package main

import (
    "flag"
    "os"

    "github.com/gookit/goutil/cliutil"
    "github.com/gookit/goutil/dump"
)

var opts1 = struct {
    age  int
    name string
    str1 string
    lOpt string
}{}

// go run ./_example/rawflag.go
// go run ./cflag/_example/rawflag.go -h
func main() {
    c := flag.NewFlagSet("mycmd", flag.ContinueOnError)

    c.IntVar(&opts1.age, "age", 0, "this is a int option")
    c.StringVar(&opts1.name, "name", "", "this is a string option and required")
    c.StringVar(&opts1.str1, "str1", "def-val", "this is a string option with default value")
    c.StringVar(&opts1.lOpt, "long-opt", "", "this is a string option with shorts")

    err := c.Parse(os.Args[1:])
    if err != nil {
        if err != flag.ErrHelp {
            cliutil.Errorln("Error:", err.Error())
        }
        return
    }

    // after parse, do something
    handleFunc1()
}

func handleFunc1() {
    cliutil.Infoln("after parse, do something")

    dump.P(opts1)
}
显示帮助
go run ./cflag/_example/rawflag.go -h
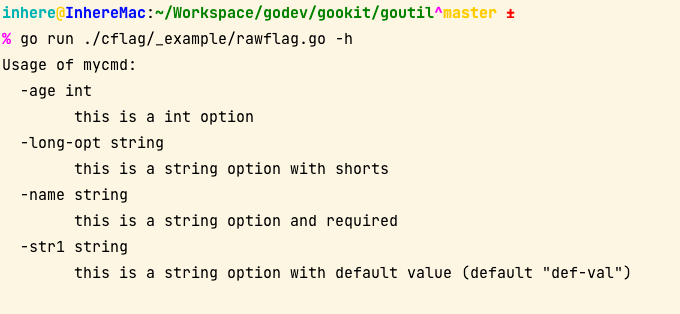
不足的点
它是Go内置的包,使用也非常简单。但是有一些不足的点:
- 不支持给选项添加短选项
- 不支持解析后续参数信息
- 不能检查选项是否为空
- 渲染的帮助信息非常简陋
使用 cflag 包
cflag - 包装和扩展 Go flag.FlagSet 以构建简单且漂亮的命令行应用程序
- 使用跟 Go
flag一样简单 - 支持自动渲染漂亮的帮助信息
- 允许为标志选项添加短选项,并且允许多个
- 允许绑定命名参数
- 允许设置参数或选项为必须
- 允许设置参数或选项的验证器
安装
go get github.com/gookit/goutil/cflag
使用示例
跟 Go flag 一样的绑定选项信息。同时额外新增了一些信息,比如 版本,描述等
cflag/_example/cmd.go
package main

import (
    "os"

    "github.com/gookit/goutil/cflag"
    "github.com/gookit/goutil/cliutil"
)

var opts = struct {
    age  int
    name string
    str1 string
    lOpt string
    bol  bool
}{}

// go run ./_example/cmd.go
// go run ./cflag/_example/cmd.go -h
// go run ./cflag/_example/cmd.go --name inhere -a 12 --lo val ab cd
func main() {
    c := cflag.New(func(c *cflag.CFlags) {
        c.Desc = "this is a demo command"
        c.Version = "0.5.1"
    })
    c.IntVar(&opts.age, "age", 0, "this is a int option;;a")
    c.StringVar(&opts.name, "name", "", "this is a string option and required;true")
    c.StringVar(&opts.str1, "str1", "def-val", "this is a string option with default value;;s")
    c.StringVar(&opts.lOpt, "long-opt", "", "this is a string option with shorts;;lo")

    c.AddArg("arg1", "this is arg1", true, nil)
    c.AddArg("arg2", "this is arg2", true, nil)

    // add handle func
    c.Func = handleFunc

    c.MustParse(os.Args[1:])
}

func handleFunc(c *cflag.CFlags) error {
    cliutil.Magentaln("hello, this is command:", c.Name())
    cliutil.Infoln("after parse, do something ...")

    cliutil.Yellowln("option values:")
    cliutil.Infoln("opts.age =", opts.age)
    cliutil.Infoln("opts.name =", opts.name)
    cliutil.Infoln("opts.str1 =", opts.str1)
    cliutil.Infoln("opts.lOpt =", opts.lOpt)

    cliutil.Yellowln("argument values:")
    cliutil.Infoln("arg1 =", c.Arg("arg1").String())
    cliutil.Infoln("arg2 =", c.Arg("arg2").String())

    cliutil.Infoln("\nremain args =", c.RemainArgs())

    return nil
}
设置必须和短选项
可以设置选项为 required 必填项,并且支持设置 短选项 名称。
TIPs: 通过扩展解析了选项的
usage来实现required和shorts
usage 格式
- 默认:
desc - 格式1:
desc;required - 格式2:
desc;required;shorts required: 一个布尔字符串。标记选项是必需的- True:
true,on,yes - False:
false,off,no,''
- True:
shorts: 选项的快捷方式名称,允许多值,用逗号,分隔
示例:
    // set option 'name' is required
    c.StringVar(&opts.name, "name", "", "this is a string option and required;true")
    // set option 'str1' shorts: s
    c.StringVar(&opts.str1, "str1", "def-val", "this is a string option with default value;;s")
绑定和获取参数
绑定参数信息
    c.AddArg("arg1", "this is arg1", true, nil)
    c.AddArg("arg2", "this is arg2", true, nil)
获取参数信息
    cliutil.Infoln("arg1 =", c.Arg("arg1").String())
    cliutil.Infoln("arg2 =", c.Arg("arg2").Int())
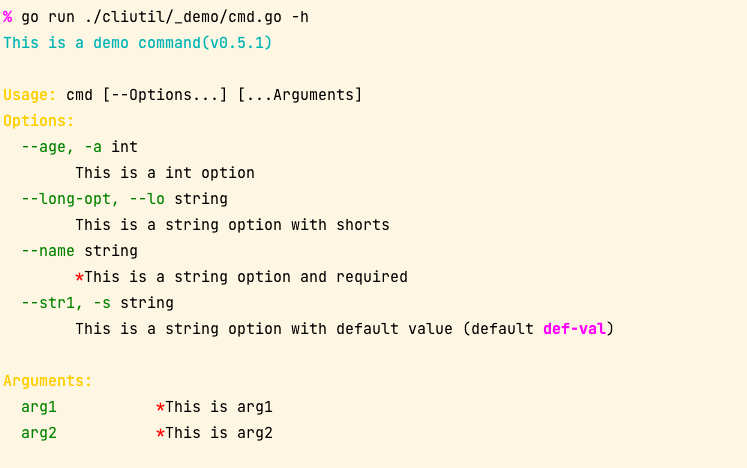
显示帮助信息
go run ./cflag/_example/cmd.go -h
Output:
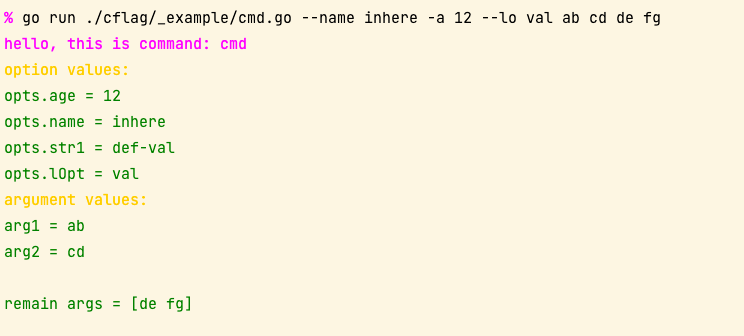
运行命令
go run ./cflag/_example/cmd.go --name inhere -a 12 --lo val ab cd
go run ./cflag/_example/cmd.go --name inhere -a 12 --lo val ab cd de fg
Output:
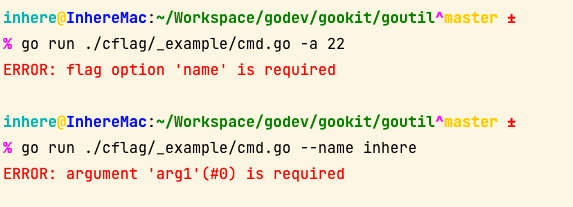
required 检查
go run ./cflag/_example/cmd.go -a 22
go run ./cflag/_example/cmd.go --name inhere
Output: